Friday 30 December 2011

How to: roast a chicken

For someone who is quite a good baker (ha, this sounds so big-headed!), I am THE WORST at cooking. I can't do it. I don't even try. I know how to make pasta and er, grill things on my George Foreman, but that's about it. If I want anything more complicated I'll probably buy the separate bits ready-made and just assemble them (that's awful, I know).

But this must change! We're moving out of the city centre in just a few months, and won't be surrounded by shops. So I reckoned learning how to cook would be a pretty good new year's resolution.

I thought I'd jump in the deep end and try to roast a chicken. Here's how I did it.

First, find yourself an amazing recipe blog! I stumbled across a Wee Bit of Cooking, and I'd definitely recommend having a read of this if you are looking for food inspiration (she also likes dogs, bonus). I used the roast chicken and root vegetables recipe and tweaked it a little bit.


Gather your ingredients!

  • one small chicken (mine was 1.2 kg)
  • 6 - 8 smallish potatoes, cut in half
  • couple of carrots, peeled and chopped into large bits
  • couple of parsnips, peeled and chopped
  • one onion, chopped into sixths
  • one lemon, cut in half
  • olive oil

I think you are meant to use salt, pepper, thyme and garlic, but I didn't have any of those, so just winged it.


Preheat your oven to 190 degrees and look out a big oven dish! Prepare your chicken by squeezing the lemon juice all over it. Once it's totally covered, pop both halves of the lemon into the cavity, and put the chicken in the middle of the dish.

Now lightly cover your vegetables with oil (I found the easiest way to do this was popping them into a separate bowl, so I could just use a little oil and stir it around). Arrange the vegetables around the chicken and try to space them out as much as possible (I may have got a little carried away with potatoes).

Pop into the oven for 1 hour 20 minutes. I opened the oven twice to turn the vegetables (as there were so many!), and cover them with the juice that was nicely bubbling in the bottom of the dish.


& that's it! To check if the meat is ready you can either use a meat thermometer (I didn't) or give it a wee prod to check if the juices run clear. If it's cooked, move the chicken to another plate, cover with tinfoil and leave for about 15-20 minutes (this apparently lets the meat settle and makes for a nicer dish). I put my vegetables back in the oven while this was going on to get them nice and crispy.


Carve up your chicken, serve with veg & voila! I didn't attempt to make gravy on this occasion (I will next time), but I didn't even notice it was missing. I'm so pleased that my first roast was a success! The chicken is really soft and has lovely lemony undertones, and the vegetables were crunchy on the outside but nice and soft on the inside.

Here's hoping that the rest of my cooking attempts in 2012 go as smoothly!

Wednesday 28 December 2011

The Wizarding World of Harry Potter

I had planned to do this post to tie in with a Harry Potter themed recipe (butterbeer cupcakes maybe?), but after watching a Deathly Hallows marathon on boxing day I couldn't resist doing it now. The Harry Potter films have turned into one of my Christmas holiday staples over the last few years... I think I might buy the box set and have a HUGE movie marathon soon!

Anyway, earlier this year Craig & I went on holiday to Florida... pretty much fueled by my selfish desire to go to the Wizarding World of Harry Potter at Universal Studios. When we were finally in America and on route to the park I was really nervous... I'd read that it was quite small (it's part of the Islands of Adventure, not a park by itself), and that queues were horrendous.

But ahh, it was beautiful.


Hiya Hogwarts!


You walk into Hogsmeade across a bridge and are greeted by a lovely snowy village - very surreal when the weather is scorching!


This is the Three Broomsticks  - we had lunch here! They serve English pub food (or at least, MASSIVE American versions of it), and it makes a nice change from normal theme park food.


The streets were absolutely heaving - we deliberately went on (what was meant to be) the quietest day of the week. I can't imagine how busy it must be on a Saturday afternoon!


The attention to detail in the park was amazing - look at the windows in Ollivanders! You could take part in an experience to choose a wand in the shop, but we weren't brave enough to join the queue. It's meant to be amazing though. Next time!

Ridiculously summery freckles
We had Butterbeer! I was expecting not to like it, but it was gorgeous! Really creamy and butterscotchy. There's a few recipes kicking about online, I might give it a go one day.


Mmm. I bought chocolate frogs and they were lovely.


Hogsmeade Station was actually the bag check for one of the rollercoasters! There's a few rides dotted around (including a Hippogriff one, where you have to learn how to bow to them). We had bought an express ticket for the park and it was so worth it. I think it was around $30, but it means you get to jump to the front of the queue to almost every ride in the park! Perfect on a hot sunny day.


The main attraction is Hogwarts (of course it is, look at it!).


You get to go INTO the castle for "Harry Potter and the Forbidden Journey". We weren't allowed to use our express ticket on this (and the wait was an hour!) but it honestly didn't matter. You go through different parts and it's so so so well done - you start in the greenhouse, then the portrait gallery (this bit was my favourite!), through the Defense Against the Dark Arts classroom, Dumbledore's office & more. Amaaaazing. Even Craig enjoyed it!


Ahh, it was lovely. Poor Craig had to practically drag me away after a couple of hours.

But they are apparently planning to expand it, which means I'll have an excuse to go back!

Monday 26 December 2011

December instagram

I hope you all had a lovely Christmas & are having a great boxing day so far! I'm on a mission to watch as many movies as possible, and I am doing very well! Here's an update of instagram photos from the last week...


1. Happy birthday to me! I turned 26 on December 22nd, and on the day before my birthday I came across loads of old photo albums... which included this photo of me as a toddler! I wish my hair was still as curly.

2. Birthday present from the wonderful Craig (it's a tiffany's necklace with a bow on it). I feel so spoiled! Had an absolutely lovely day - signed the papers for our house, went out for tea and cake at Mimi's Bakehouse, watched Puss in Boots, met up with wonderful friends & went dancing! Managed to stretch the celebrations over two days, and saw even more of my friends, went for dinner & drinks in Ghillie Dhu. Lovely.

3. Another birthday gift (lucky me!) - a sheriff's badge! I insisted on wearing this on my birthday & felt like an excellent grown up in our meeting with the solicitor (ha ha ha).

4. Santa hat! Slightly grumpy expression. Promise I was excited about Christmas.

5. Christmas eve preparations! Wrapped up my candy cane cookies in cute wee bags from paperchase.

6. Christmas pudding nail art. I received lovely no 7 nail varnish in my work secret santa & the colour was perfect for a pudding base.

7. This was Christmas morning.. I was impatiently waiting for Craig to come through so we could open our presents! This is his bundle... I absolutely love his stocking.

8. Mmm, chocolates from Coco Chocolate. Cannot wait to eat these, but they are too pretty to open!

9. Beautiful Christmas present from Craig! I've wanted something by Michelle Chang for ages and absolutely wasn't expecting it. So lovely.

10. My bloggers secret santa present (which was organised by Rani from Cupcake Couture). My parcel arrived a couple weeks ago and I have been so looking forward to opening it!

It is really lovely & such a thoughtful gift. I got edible cake toppers (with roller skates on them!!), heart cookie cutters, Cath Kidston hand cream, nail transfers (with birds on them - can't wait to use these), cute cupcake wraps, a mini horse, horse transfer tattoos (haha) AND a vintage copy of Northanger Abbey. It's also just been revealed that my secret santa was Ingrid from says Ingrid - thank you so much!

I think all of my family liked their presents too (here's hoping!) - it's always my favourite part of Christmas day. I also made Craig a ridiculous panda card (which you can see here.. my photoshop skills are coming on a treat - ha ha) as part of his present... we're going to see the Edinburgh pandas one day soon. There's loads to look forward to in the new year!

Sunday 25 December 2011

It's Christmas!


Hope you are all having a lovely day with family, friends & lots of food! We'll be zooming across central Scotland to see both our families... I can't wait!

Things present in this photo, but sadly out of shot: santa hat, christmas jumper, christmas onesie, full extent of Riley's "sad cat who hates getting family photos taken" face. 

Saturday 24 December 2011

How to: bake candy cane cookies

It's Christmas eve! I hope you are all having a lovely and relaxed day (I'm currently watching Pretty Woman... does that count as a Christmas film?). I thought I'd post this recipe up as it is suitably festive, and quick and easy to do - perfect if you are in need of a last minute gift!

Candy cane cookies! (aww). I used the basic biscuit recipe from BBC good food and tweaked it a little bit... 

Candy Cane Cookie tutorial

Turn your oven on to 180 degrees & gather the following ingredients:
  • 250g butter
  • 140g caster sugar
  • 1 egg yolk
  • 2 teaspoons of vanilla extract
  • 300g plain flour
  • red food colouring
You'll also need a couple of flat baking trays lined with baking paper. 


Start by mixing the butter and sugar, then add the vanilla extract and egg yolk. Stir together until it is nice and smooth!


Add in the flour and mix your dough. It'll get a little tough to stir (and look like the photo above), so use your hands to knead it all together.


When it's nice and smooth split it into two and add red food colouring to one bowl. It only needed a couple of drops to turn this colour, so be careful not to add too much! If the mix is too soft you can stick it in the fridge for a little while (20 mins or so) until it firms up.

Candy Cane Cookie tutorial

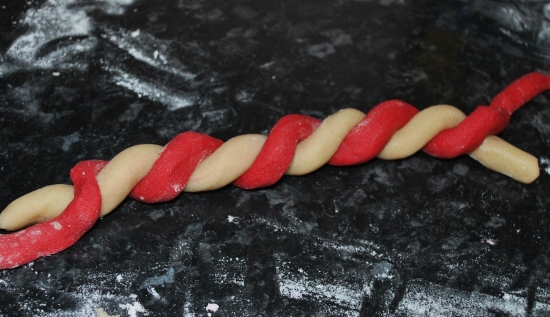
Now cover your worktop with flour (to prevent the mixture sticking to the surface), and roll out the dough into long ropes (I just did this by hand).

Candy Cane Cookie tutorial

And start to twist them together.


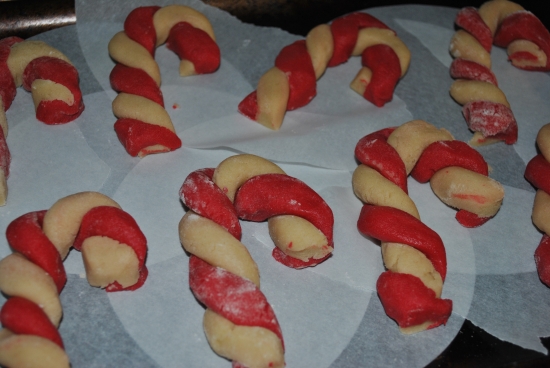
When it's a suitable length, cut at both ends to neaten up, and curl the top round to form the candy cane shape. Use a spatula to move them onto the baking tray. Practice helps a lot, as you'll see between my first and second attempts (see above!).

Candy Cane Cookie tutorial

Space them out evenly on a baking tray (as they'll expand as they bake), and pop in the oven for 12 - 15 minutes.

Candy Cane Cookie tutorial

Once they are ready, carefully move them onto a wire rack to cool (they'll still be quite soft at this point so use a spatula to move them over). Once they've cooled completely you can pop them into a christmassy box or bag and give as gifts! (or eat them all by yourself). This recipe made 18 (quite large) cookies.

Wednesday 21 December 2011

HOW TO:
Use a hair doughnut

Here's a really easy hair how to, which takes five minutes, looks a LOT more complicated than it actually is, and will give you ace party hair! It works on any hair type (and is actually really good for fine hair that struggles to stay in updos) and gives you a massive fun bun, like this...

Easy hair doughnut tutorial

All you need is some kirbys, some hair spray and a hair doughnut (also known as a hair donut or sponge) which looks exactly as it sounds. They tend to come in a light yellow, brown & black, so you can pick one that roughly matches your hair.


Here's how you do it.

Easy hair doughnut tutorial

Step 1. Put your hair in a ponytail. Bear in mind that where you position this will determine your bun's final position, so aim high if you are wanting a top knot or ballerina-esque style!

Step 2. Thread your ponytail through the middle of the doughnut.

Easy hair doughnut tutorial

Step 3. Find the centre of your ponytail that is pulled through the doughnut, and sort of smoosh it round to cover the sponge. The photos above will hopefully explain this step a little more clearly! You can easily feel where the doughnut is still poking through, so just use your hands to smooth the hair round evenly until you're happy.

Easy hair doughnut tutorial

 Step 4. With one hand on the centre of your bun (to keep the main shape in place), slowly start to wind the end of your hair in a circular motion round the doughnut.

Step 5. As you are wrapping it round you'll find it naturally tucks in under the bun, so just work your way round keeping the bun tight (and making sure that the bun is still smooth and fully covered!).

Easy hair doughnut tutorial

Step 6. Use kirby grips to secure the hair wrapped round the bottom of the bun.

Step 7. Work your way round until it feels secure, and you are sure that the bun (or doughnut) ain't going to fall out. At this point you can make the bun as neat or messy as you like. I am forever scruffy, so this is about as neat as I get!

Easy hair doughnut tutorial

& that's it! Like I said above, I tend to wear my hair a little looser (aka messier) so even with a big fancy bun I tend to leave bits to hang down, but you can easily make the bun tighter and neater.

Easy hair doughnut tutorial

I'm a happy bun wearer.

Tuesday 20 December 2011

Nails of 2011

I saw this post on This Fashion is Mine and thought it was such a lovely idea to blog about, that I would do it myself!

I've never really painted my nails before this year - I was a bit of a tomboy in my early teenage years, and I would always chip my nails at horse riding or bite them (which drives me mad!). But when I was down in London early this year I popped into Wah nails & became a total nail art convert! I find it really addictive AND it has proven to be the only thing that actually stops me from biting my nails... which is a good thing.

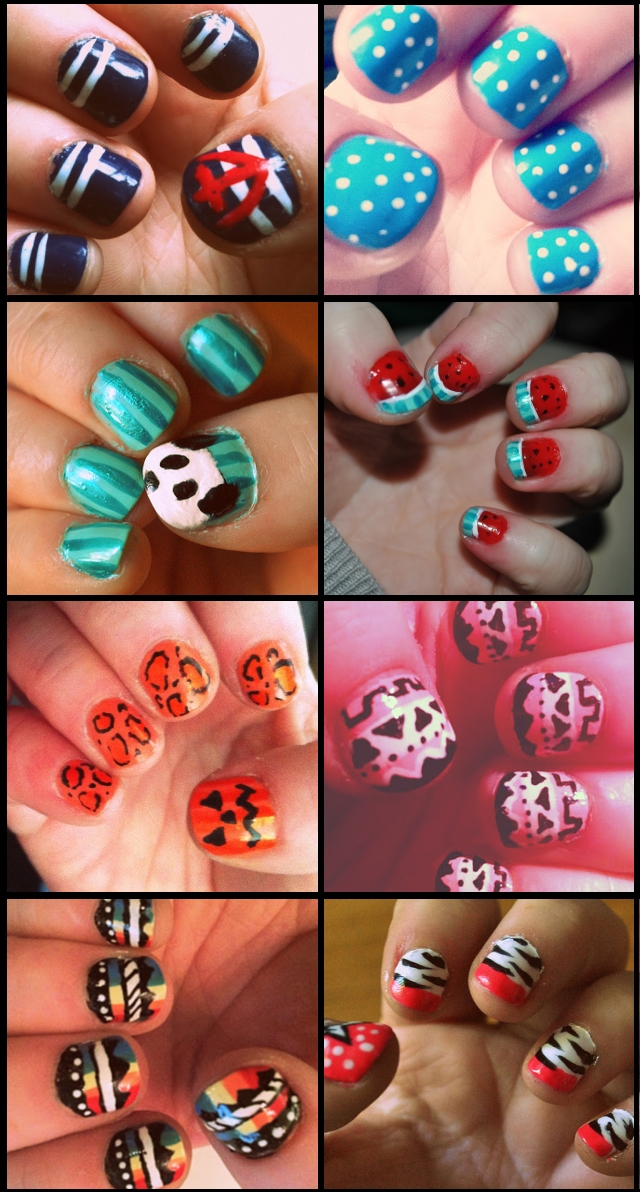
These are my favourite nails from 2011....


1. Nautical - I was so proud of managing to do straight lines with a (soon dying) nail art pen from Claire's! I still really like nautical nails, I think they go with loads of things that I wear and are easy to do!  

2. Blue polka dots - I love polka dot nails. So quick, look lovely in every colour. Ace.

3. Pandas - I should maybe think of doing these nails again, as pandas have recently moved to Edinburgh (my favourite jokey fact about this is that there are now more pandas in Scotland than Tory MPs, ha).

4. Watermelons - one of my first attempts at nail art, this was done all with kirbys and toothpicks! Really fun and sweet for spring.

5.  Halloween pumpkins - I blatantly copied wah nails for this one but used a metallic orange (which actually smelled of oranges, amazing!). I loved the pumpkin faces!

6. Pink aztec - surprisingly, these nails didn't take too long to do! Loved the black tips, but kept chipping them. I definitely need to invest in a better top coat...

7. Rainbow aztec- these look really scruffy but they were fun and bright! I also did the worst ever tutorial for them, which made the most of my awful photoshop skills.

8. Zap! Pow! Zebra nails - again, another copy from wah nails! Zebra nails are so easy to do and I got so many compliments! I might do them with glittery tips as my new year nails.

What a colourful year. I'd like to say I'm getting better, but I think I'm just as scruffy now as I was at the start. Onwards and upwards I guess...

Monday 19 December 2011

Alternative Christmas songs

Looks like Christmas is fast approaching... less than a week to go! I've managed to survive three nights out in a row (big party at the National Portrait Gallery, work Christmas lunch & a festive night in at my lovely pal Rae's house - where I wore my onesie, ha), so I am feeling the holiday spirit!

I have quite a ridiculous taste in music these days (my teenage self would be quite ashamed, I reckon), but alongside listening to Michael Bublé's Christmas album on repeat (it's just SO good), I do have a couple of favourites that are a little different that I wanted to share. Here goes.

1. Tim Minchin - White Wine in the Sun


Tim Minchin is an Australian comedian (you've heard of him, surely?), but his Christmas song is much more serious and sweet than his usual material. It's also not that keen on religion. It's an ode to family and being together and is SO beautiful. It's lovely. I love him.

2. Robert Downey Jr. - River


Oh my god, this song! This man! It's so beautiful, it's ridiculous. It appeared way back when on Ally McBeal (when he was it in as Larry... did anyway else watch it?) and I remember burning into onto loads of mix cds that I made! You can see the scene it appeared in here.

3. Frightened Rabbit - It's Christmas So We'll Stop


Frightened Rabbit are a Scottish band (I've mentioned them a little before) and their take on Christmas is much more cynical ("now the cold has turned away, we can be best friends with the people we hate") but it's a good choice if you are completely over cheesy Christmas music (ahem). There's also a really good choir version of the song here.

Monday 12 December 2011

Primark opens in Edinburgh

After a very (very) long wait, Primark has FINALLY opened up in Edinburgh! 

This is exciting for various reasons...  it's a massive 75,000 square feet so is their newest flagship store (and the biggest one in Europe, I believe?!) spanning a huge five floors; it's a well-needed boost to a boring Princes St; I'm skint (because of wonderful house-buying!) so I can only buy things if they are a total bargain from now on... AND I got to go in for a sneak peek on Friday night before it opened!


We were ushered in, handed champagne (hello) and then whisked round the shop on a big tour. I was far too distracted to take many photos, but I couldn't believe how SHINY and clean everything was. It was also a total treat getting to see everything laid out really neatly and in order - I normally only get to go to Primark in Glasgow on Saturday afternoons, where it feels like a bit of a free for all!  


 After our tour we were then allowed to shop (with the help of a wee treat in our goodie bags, thanks Primark!) and it was SO surreal. At several points there was only myself and one shop assistant in sight, and it felt a little like being in a zombie film (er, a lovely and shiny shopping zombie film). I'm just not at all used to shopping in such peace and quiet... but I could easily get used to it.

I got a little caught up in the giddiness of the moment and bought an embarrassing amount of stuff.

Hello bags. You are many, and full of wonder.

I look a bit frazzled in this photo, but that's probably because I have just bought half of the shop! I had originally planned to try and buy dresses (for all the festive/birthday/hogmanay events I have coming up), but I failed completely and was utterly drawn to anything that was cosy....

.... including a onesie.

Definitely my new favourite outfit. Oh lord.

A festive onesie, no less. Judge all you want, it's incredibly warm and pretty much the best £10 I've recently spent.

Primark is likely to be absolutely HEAVING until Christmas, with the new shop opening excitement and all, but it's open til 8pm each weeknight if you are feeling brave!

Friday 9 December 2011

I bought a house!

Print on Etsy

Hello! I've got some exciting news to share (can you guess what it is? Ha). I've mentioned very briefly before that Craig & I were house-hunting (and had found a lovely place), but I was doing my very best not to get TOO excited while the mortgage application was going through... I've heard so many horror stories about things that happen to first-time buyers, and was paranoid that something unexpected would happen to us!

But hooray, hooray, this morning I got an email saying that our application has gone through and paperwork is in the post!

We've gone for a new-build house on the outskirts of Edinburgh - it's only 30 minutes from the centre of town by bus (which is nothing!), but is right next to a country park AND an equestrian centre (hello!). 

We'll have a garden which means that Riley will be allowed to go outside, and sometime next year we can get a dog (and I've already been given the go ahead to bring future dog to work with me!). It's also got three bedrooms, so I can fulfill my life long dream & have a personal library (something like this would be lovely).

It's not actually built yet, but we have a provisional move-in date in April! This gives me four months to plan what to do with each room, get obsessed with interiors/design blogs (send me links please!), wait impatiently for an pinterest invite & squirrel away all money I can into savings!

Yay. What a happy Friday treat.

Thursday 8 December 2011

Fast drying nails

For someone who has a bit of a teenage nail polish addiction, I am quite rubbish at it. I never paint my nails neatly or keep them a normal length and I ALWAYS manage to touch my nails before they have dried, which means I have permanently slighty-smudged nails.

So it was quite exciting to get a recommendation from a friend for Elegant Touch rapid dry spray which boasts to get a "flawless finish after applying nail polish".

I painted my nails as normal (aka whilst being totally distracted watching a rubbish-but-good film) and then sprayed my nails. It was quite weird & left my fingers looking a little shiny, but not long after I got this...


 Ooh. Glossy nails! Without fingerprints or smudges. It says it is touch dry in 60 seconds, but obviously takes longer for the polish to actually dry. Still! They are nice and shiny today, and it makes a big difference if you usually just let your nails dry naturally.

It costs £3.65 and looks like this...

Hello.

Has anyone tried it? Any other tips to help nails dry faster?