Monday 31 October 2011

Happy Halloween!

I've gone a little mad in my halloween posting over the last few days (you can see everything under the tag if you like) but I love it - the costumes, the make up, the baking, the crafts, everything! It's an excellent excuse to act like a child and just have fun with friends.

I've been horrendously unorganised this year (I ended up baking NOTHING in the end, I am so ashamed) & pretty much didn't know my party plans until the very last minute.. but we ended up getting some friends round for charades, Beyonce singalongs and late night fun. This is what it looked like.


My cat pumpkin, Craig's panda pumpkin, Halloween spread (all bought, ugh! I did "decorate" the ghost marshmallows though!).


Jude was a zom-bee, Craig went all sugarskully (I did his make up and was quite chuffed with it!), Brig rocked my purple wig, Rae was a murderous butcher, Niki was a spooky, er, spook & I did zombie make up (with a bit more blood!).


We played sort-of-made-up-but-fun halloween group charades, sang really loudly (sorry neighbours), danced (sorry neighbours) and went to bed way too late. Fun fun fun.

Hope you had a good weekend too!

Friday 28 October 2011

How to: halloween pumpkin nail art

Happy (almost - it's the weekend before so I am pretending) Halloween!

To celebrate the upcoming weekend (fun things are happening!) I took a wee bit of inspiration from wah nails (read loads), and did a leopard print/pumpkin manicure. I really need to get out of the leopard print rut as I seem to do it almost constantly, but it is just SO quick and easy (and I am lazy).


Anyway, I changed things about a little from the original design and I really like it!

I started with a base of fuzzy peach by models own. I got this colour in their pastel gift set when they were doing their massive sale earlier this year and hadn't used it yet (bit worried about the orange nail/red hair clash, I guess!). But I quite like it! It goes on a little watery at first, but two coats was enough to even the colour out.

Then I used my new orange crayola polish which is amazing because it smells like oranges and is slightly shimmery and sits so nicely against the pastel orange (hint, I am giving some away over on this post). I did splodges on my nails for the leopard print effect on four nails, and did very thin stripes (using the thinner edge of the brush) on my thumb nail to create the back of the pumpkin. The stripe effect is really subtle, so you don't need to worry about being too precise, which is nice!

I then took my new favourite nail art pen (a crayola one, which I am also giving away) to outline the leopard spots and create the pumpkin faces on my nails. The pen is SO easy to use so this was pretty simple (even using my left hand). If you were skipping the leopard print you could do a different pumpkin face on each finger. Fun! (I had meetings this week and attempt to pretend to be professional, so I tried to limit myself!).

It's such a simple design to do, I highly recommend that you give it a go! & er, have I plugged my giveaway enough? (ha, sorry!).

Have a lovely weekend, and remember to look here if you are stuck for costume ideas! See you on the other side.

Thursday 27 October 2011

Danny & Annie

Here is something a little different for today (a very brief pause from halloween food, make up and costumes!). Earlier a friend messaged me a link to the below video with a very brief instruction.
"go and watch the video
you'll love it
it's about love"

So I did. & you should too.


Danny & Annie from StoryCorps on Vimeo.

This is easily one of the loveliest things I've seen in a very long time. It's easy to get tired of soppy things and bored of cliches (and get fed up of celebrity "romances" and people who do stupid things), but this is an easy way to remind yourself of the good in the world. I love love. I love Craig! I love friends and family and pets and people who are far away. I probably don't tell them enough, but I do.

p.s. warning. The video might make you cry.

Wednesday 26 October 2011

HALLOWEEN HOW TO:
EASY ZOMBIE MAKE UP

easy simple zombie make up tutorial

Oh hi. As 
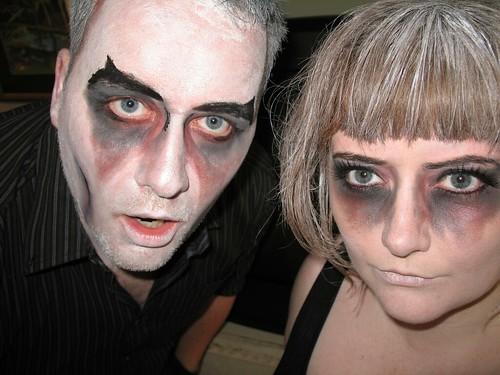
I've mentioned before, I really like dressing up and doing daft things with make up. As Halloween is fast approaching I thought it might be useful to do a wee tutorial of how I do zombie/ghoul/undead make up. (I'm not saying this is the best way to do it, but it's really quick and easy and only uses things that are common in make up bags - handy for lazy people!).

There's a few different schools of zombie make up. Some people like to look gory, and be covered in bits of rotten flesh and blood. This is cool, but you'll need to go to a joke shop for liquid latex to do this properly. I prefer a more "natural" look (ha) with smokey sunken eyes and cheeks. It's creepy! & ahem, easier. Also if you do your make up this way and decide to rock the fake blood then it's really easy to do so (not so much the other way round).

So. Here's how you do it. I should point out these photos are brighter/lighter than I was in real life - mainly because my camera has a mental flash, and I wanted to make sure each step was clear. Which it hopefully is! Also - sorry for my deadened expression. I was getting in character, obviously.

 Step 1. Try to get your face as pale and matte as possible. Because I'm wasn't going to put make up anywhere other than my face, I didn't use white face paint (too much of a contrast) and instead piled on the lightest foundation I had. Use white eyeshadow sparingly across nose/cheeks/eyes, just to keep it as pale as possible. Use cheap face powder (I used No 17 from Boots) to even it out/get rid of any shiny bits.

Step 2. I've got about three different shades of metallic red eyeshadow that I never use (other than Halloween). You probably do too! Use this all over your eye lids and below your eyes, creating a bit of a v-shape under each eye socket. It's best to keep this bit messy - you want to look like the eye sockets are bruised so use your finger to blend the colour. Blend the red so it runs into the sides of your nose.

Step 3. Get a dark grey or black eye shadow and smudge on your eye lids (up to the corner of each brow) and slightly below the eye. See how the red colour shows through? It looks really good and bruised!

Step 4.  Add eyeliner. This is probably an optional step, but I always wear eyeliner so it was happening. Liquid eyeliner will stand out over the dark shadow on your lids.

Step 5. Take a black eyeliner pencil and colour in your eyebrows. I kept it quite rough and messy. Cause you're undead, you know. You'll have messy eyebrows.

Step 6. Pull a really good expression, take a photo of it and post it on the internet. Nah. Use your red eyeshadow to line your cheekbones, really blending the colour under the bone. Once you had a good (but nicely blended!) line of red shadow, add some black on top, staying underneath the cheekbone.

easy simple zombie make up tutorial
Step 7. Take a black pencil and add lines to places that need a little extra definition. I did a couple of (rough and messy) lines on the shadow on the sides of my nose and my cheeks. Blend the line a little bit with your finger, but not too much (i.e. you want to make sure the definition is there, but not look like you have just been drawing lines on your face).

Step 8. Add mascara and (if you've got it) fake blood. I didn't, so I used benetint under my nose and by the side of my mouth. Fake blood is good because it sort of scabs while it dries, but benetint (or even a brighter red eyeshadow) would do the job if needed.

& that's it! E-a-s-y. Now just pull stupid faces and pretend to bite people.


Have fun!

p.s. you can look here to see how I did zombie hair on holiday - mainly REALLY messy and pinned up with dry shampoo sprayed (for a dusty look) and a little white face cream (in my fringe/ends of my hair). Makes your hair manky but it looks a treat!

Monday 24 October 2011

Florida holiday!

Well. Where to start?


For two weeks Craig & I had a wonderful time, living it up in sunny America. We stayed in the Mystic Dunes Resort (& booked it through hotels 4 u which made it SUPER cheap!) and it was just perfect - an apartment that was bigger than our own flat (which was both amazing and slightly depressing), right next to the main roads, just round the corner from disney, perfect! 

So we ate LOADS of food...


Went to Cape Canaveral to go surfing on Cocoa Beach and visit the Kennedy Space Centre. This was VERY exciting! 


Acted like children and went to loads of theme parks - the magic kingdom, hollywood studios, typhoon lagoon, universal studios and islands of adventures (which includes the wizarding world of Harry Potter!).


(I am going to do a separate Harry Potter post by the way, because I'm a massive geek and I took TOO MANY PHOTOS. It was amazing).

& went to Disneyworld dressed as zombies for (don't laugh) Mickey's Not So Scary Halloween Party.


Phew! It was just a lovely holiday for chilling out, reading loads of books, being big kids and enjoying lovely weather (it was 30 degrees while we were there!). 

Hope that wasn't too many photos to throw in here at once, and thank you to all my lovely readers who kept coming here while I was away. The last month has been the best ever for eversojuliet, and it still amazes me that people are reading my wittering. So thank you! 

Friday 21 October 2011

Giveaway!

Hi, I'm back! I had an absolutely amazing holiday... loads of sunshine, theme parks, american food, meeting an astronaut (!), beaches, ice cream sundaes, zombie nights out, pop punk gigs & so much more!

I am currently resizing and organising over 1000 photos (oh god oh god oh god) & will have a couple of holiday blog posts soon (although only a tiny number of photos, don't worry!). But in the meantime, here's my first blog giveaway - some lovely things I picked up in the USA!


Wilton cookie cutters - these are SO cute. I swithered over getting a set for myself too and didn't because I was worried about suitcase space.... I am regretting it now! I really like food in the shape of other food... and now you too can make cookies shaped like cupcakes!

Goobers - chocolate covered peanuts. Not going to lie, I bought these purely for their name. It is daft.

Crayola nail art pen - this is AMAZING! It's so easy to use (I think maybe even easier even than the wah nail art pen!) and really does work just like a pen, no squeezing or brushes involved.

Crayola scented nail polish - these are clearly aimed at children but I don't care, they smell amazing (and actually work!). Your nails can be grape, blueberry, green apple, orange or bubblegum (or grape & bubblegum if you use it for leopard print nails).

Here's how to enter...

1. Follow the blog on google friend connect.
2. Comment on this entry with your email address.
3. For extra chances - follow on twitter (1 extra entry), like on facebook (1 extra entry) or blog about this giveaway (3 extra entries!). Tell me about this in your comment.

The giveaway will close on November 4th! Good luck.


p.s. please don't enter if you are deathly allergic to things that have been sniffed by curious cats. I did try to keep him away, but he likes to nosy at EVERYTHING.

Wednesday 19 October 2011

Hannah Zakari

I've been a big fan of Hannah Zakari for a couple of years now, so it was a no-brainer when Rachael (the owner) asked for bloggers interested in their new look book to get in touch.

Fun fact... Candlemaker Row (where the HZ shop is) was apparently the inspiration for Diagon Alley in Harry Potter!
HZ is an Edinburgh shop (and online store) selling jewellery, homeware, art and accessories from independent designers and artists. The look book arrived just before I went away, and is just as lovely as the shop itself! These were my favourite pages.

I've been eyeing up Gemma Correll's pug not drugs tote bag for AGES.. the mirror is cute too. 

The hair bow! The Vegas necklace! The amazing hair!

My very favourite image... chunky gold horse/fishtail braid combo. Lovely.

A fair amount of the prints in my house were bought from HZ, & these are lovely. (I want the Lets Stay Home one!).

If anyone is reading this that plans to buy me a Birthday or Christmas present then please look here and here, here and um, here. Is that massively shameless? Sorry. It is all lovely though.


Included within the package was a copy of the Hannah Zakari zine, which had a feature on none other than my lovely Auld Reekie Roller Girls. HZ have been taking out ads in the ARRG bout programmes recently, and I absolutely love that a shop I adore supports roller derby!


This is my last scheduled post while I've been away (hopefully you've all been enjoying the others!). By the time this is posted I'll be back in the UK and on a train heading back home to Edinburgh (presumably knackered and nervous of jet lag!).

Monday 17 October 2011

October instagram

Here's what I've been up to (pre-holiday!). 


1. Hanging out with Riley! He's currently on his cat-holidays at Jak's house, I hope he's having a nice time. I always miss him so much when I am away.

2. Having a cake transporting emergency and carrying a lovely cake in a paper carrier bag (a primark bag, no less). Such shame.

3. Wearing Juicy Jules by Models Own. It's really lovely.

4. Enjoying a wee sneaky coffee in Tinderbox in Glasgow.

5. Found my plane tickets from 2010 when getting ready for this year's holiday. These were for London, Auckland, Hong Kong, Honolulu and Los Angeles! What an amazing trip it was, I'd love to go back.

6. Celebrating my friend Aly's return to derby.. one of our lovely group brought sparklers!

7. Being a clumsy baker. Used red food colouring, got it everywhere and then looked like I had a massively cut up hand!

8. Being given lovely Swedish cider from a lovely client! Mmm.

p.s. this is a scheduled post! 

Friday 14 October 2011

Scary gingerbread

One of my Halloween traditions (I have Halloween traditions. I know that's a bit weird) is to make a "scary" gingerbread creation every year. It's oddly quite satisfying... I like taking something that's a bit cutesy and twee (like gingerbread houses) and making them a bit more badass. Saying that, I made a Christmas gingerbread house last year that was ridiculously cute and I loved it too. Anyway. That's fine.

Since I started this tradition I've made a haunted house...

It's meant to be blood dripping down the walls... in reality it just looked a bit sticky.

A scary pyramid (my favourite)..

I made this the year I did an evening class in hieroglyphs. 
& er, another haunted house...

It looks so tame! 
I don't know what I'll do this year (oh god, so much halloween planning to do when I get back to the UK!), but I clearly need to do something other than a house. It's hard though! I'll post my gingerbread recipe when I get back because it is just lovely and incredibly satisfying to make (and your house smells wonderful!).

p.s. this is a scheduled post!

Wednesday 12 October 2011

New hair


Hi! This is my holiday hair cut. I went for a much shorter fringe, because it grows so ridiculously fast and I didn't want to be struggling to see on holiday. I absolutely love it! Got my eyebrows threaded again AND my eyelashes tinted as a "holiday treat". Goodness me.

I go to Lesley at Sublime hair design in Edinburgh and I highly, highly recommend him!

p.s. this is a scheduled post!